AR8000 Serial Link
by John Hollis
Warning and Disclaimer
I accept no responsibility whatsoever for any problem or damage arising from the use or misuse of this information.Overview
I wanted a simple and inexpensive way to connect an AR8000 to a portable computer without the bulk of a full interface. This simple interface works just one way, sending data from the computer to the AR8000's external control socket. The circuit is simple enough to build into the shell of the computer's D connector.Schematic
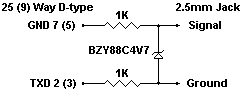
Parts List
Hints and Tips
- 1 x 25 way or 9 way female D connector
- 1 x 2.5mm jack plug
- 2 x 1K 1/4W resistors
- 1 x BZY88C4V7 or equivalent 4.7 volt zener diode
Once you have made your interface cable you need to configure your software. Set the AR8000 to 9600 baud and the terminator to CR. Set your comms package to 9600 baud, 8 bits, 2 stop. Switch on local echo so you can see what you're typing. If you are using Windows Terminal you can download the settings.Testing
Here's a simple way to check that the interface is working correctly.
- Switch on the AR8000 and put it in VFO mode.
- On your terminal type VA1234.5678 [return] and check that the AR8000 display changes to match.
- Enter EX [return] to exit remote mode.
Example Program
I found these frequencies for London Heathrow in the alt.radio.scanner.uk newsgroup and have formatted them as an example of a remote program to download a set of frequencies and names into the AR8000. If you want to try it, save the page as a text file and send it to the scanner using your spiffy new serial interface.
The External Control Socket
Many AR8000's are already fitted with a 2.5mm jack socket positioned below the 12V DC connector. The 2.5mm socket connects to the AR8000's serial interface and is used to control the AR8000 from an Optoelectronics Scout.If your AR8000 does not have a 2.5mm socket then you'll need to get one fitted. A good scanner dealer like Javiation can fit one for you.
If you are absolutely certain that you know what you're doing with expensive and delicate electronics then these details should be sufficient for you to fit your own socket. I assume you have read my disclaimer.
- Procure a good quality 2.5mm miniature jack socket.
- Remove the battery cover and the batteries.
- Remove the two screws inside the battery compartment.
- Remove the rearmost screw on the top left of the unit.
- Remove the frontmost screw on the top right of the unit.
- Gently ease the front and rear sections of the AR8000 apart.
- Put the rear section aside, you want the front half.
- Drill a hole for the 2.5mm socket. It should be positioned about 7mm in from the edge of the case and about 6mm below the lower edge of the clearance slot for the 12V DC port. Ensure that the slot will remain unobstructed.
- Fit the new socket.
- Solder a short wire from the shield side of the socket to the exposed ground pad just behind the 12V DC slot.
- Hold the unit so that the white serial connector is uppermost and take a good look at the area under the serial connector. Almost dead center is a 1K surface mount resistor.
- Solder a wire to the top of the resistor on the end nearest the white serial connector.
- Solder the other end to the signal side of your new socket.
- Inspect your work.
- Gently fit the front and back sections together again.
- Replace the four screws you removed earlier.
- Install the batteries and test the receiver.
AR8000 Resources
- Javiation - the UK's premier scanner supplier.
- Ron's Scanner Page - more scanner goodies.
- AR8000 Appendix A - detailed technical data.
- ScanStar - scanner control software.
- alt.radio.scanner.uk - UK oriented news group.
Check out the author's home page and find out more about John's Obsessions.
Revised and Verified: May 10th, 1997
Please send comments to: john@hollis.co.uk
Copyright ©1995-1997 John Hollis. All Rights Reserved. This material may not be reproduced in any form without the prior written consent of the author. Trademarks are acknowledged where used.